Integrating HubSpot with AWS Lambda
Like many organizations, tecRacer uses HubSpot as a CRM. Integrating Hubspot with other (internal) systems enables smooth workflows for everyone involved. Since I recently built a custom integration, I thought it may be helpful to explain how to set up a secure interface with AWS.
In our use case, we wanted to react to changes inside HubSpot and update data in another system. This meant we were looking for a way to have webhook-like capabilities, allowing us to use Lambda to run custom logic.
Initially, we explored Zapier as an integration platform, which would have enabled us to trigger a Lambda function in response to a HubSpot event. While that would have worked, the drawback is that the target system doesn’t have a Zapier integration, which means that Zapier would have just been an expensive trigger system. If source and destination have Zapier integrations, definitely check it out, though. For us, DIY was the best approach.
To build a custom integration, we need to create a private app in HubSpot, which these docs outline. The private app has two main functions:
- Enable the use of the HubSpot API to read and write data
- Configuration of event-driven integrations through webhooks
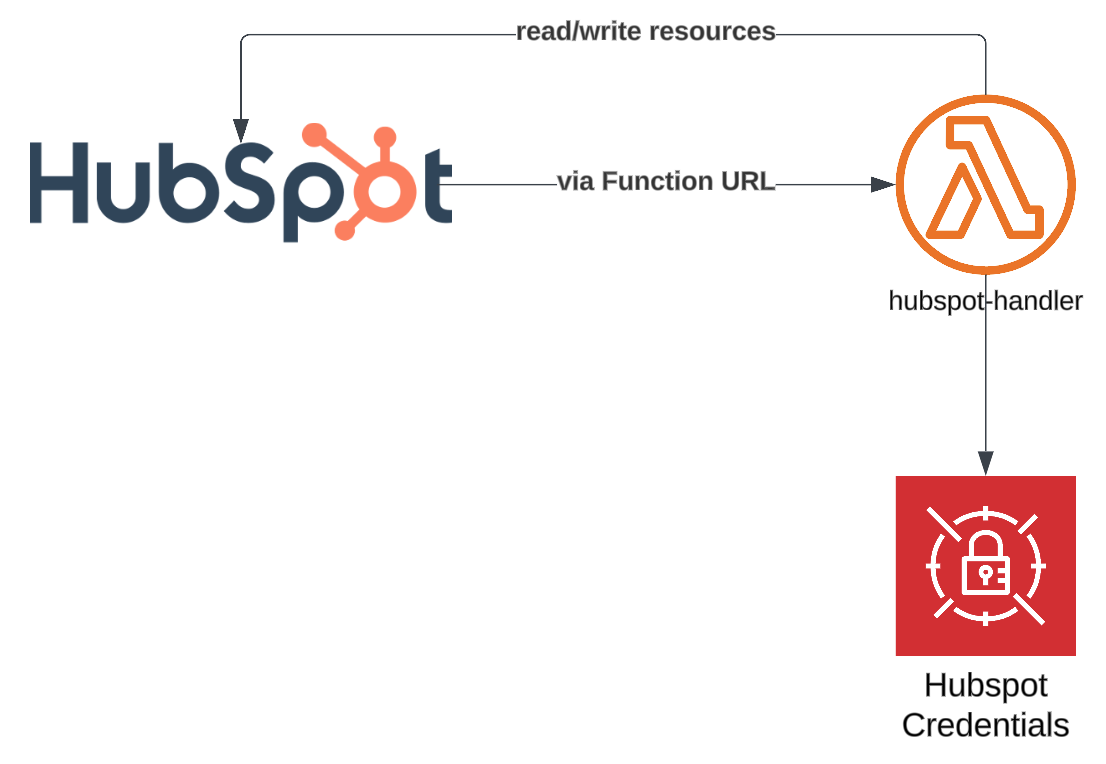
On the AWS side of the picture, we want to keep things as simple as possible. The AWS part is primarily responsible for accepting the webhook trigger and then communicating with HubSpot and our other system. A Lambda function URL is the easiest way to provide an endpoint for the webhook. An API Gateway in front of Lambda would have also worked, but we don’t need custom domains or any of the other things it supports. This Lambda function can then do whatever it wants with the data.

The main reason why I wrote this post is authentication. Lambda function URLs support IAM authentication, but that’s not supported by HubSpot. Instead, HubSpot cryptographically signs the events it sends and we can verify that signature to check that the request is coming from our private app. Signature verification requires access to the app’s client secret. Later communication with the HubSpot API needs the app’s access token, both of which we’re storing in the AWS Secrets Manager.
Based on this, the implementation of the Lambda function looks roughly like this:
def lambda_handler(event, _context):
    access_token, client_secret = get_access_token_and_client_secret()

	if not is_hsv3_signature_valid(event, client_secret):
	    return {"statusCode": "403"}

	api_client = HubSpot(access_token=access_token)
	# ...
HubSpot provides the signature (X-HubSpot-Signature-v3) as well as the timestamp used to create it in HTTP headers that are sent to the Lambda function URL. There are multiple versions of this signature; the current recommendation is to use v3, which I will talk about here.
Before we even compute the signature, the documentation recommends that we reject any request where the signature timestamp (X-HubSpot-Request-Timestamp) is older than five minutes, presumably as a protection against replay attacks. Assuming our request is within that five-minute window, we can proceed to compute the signature. For that, we need some information from the request, i.e., the event data structure that invokes our function URL:
request_methodfromevent["requestContext"]["http"]["method"]request_uri, which is concatenated fromevent["requestContext"]["domainName"]andevent["requestContext"]["http"]["path"]request_bodyfromevent["body"]timestampfromevent["headers"]["x-hubspot-request-timestamp"]
Next, we concatenate the values in the order that I listed them and run them through an HMAC SHA-256 function, with the key being the private app’s client secret. The result of this is then encoded using Base64, which ends up being our signature. If our computed signature matches the one in X-HubSpot-Signature-v3, we can be sure that the request originates from our HubSpot app and wasn’t modified in transit.
The Python implementation requires no external dependencies as all components involved are part of the standard library:
import base64
import hashlib
import hmac

def is_hsv3_signature_valid(
    event: dict, hs_client_secret: str, recent_timestamps_only=True
) -> bool:
    """
    Validates the signature on an Event received by a Lambda Function URL sent
    by hubspot according to the v3 Signature spec.

    https://developers.hubspot.com/beta-docs/guides/apps/authentication/validating-requests

    Parameters
    ----------
    event : dict
        The event the lambda function receives.
    hs_client_secret : str
        The client secret of the (private) app.
    recent_timestamps_only : bool, optional
        Enable or disable age verification on the timestamp, by default True

    Returns
    -------
    bool
        True if the signature is valid, otherwise false.
    """

    five_minutes_ago_epoch_ms = (
        datetime.now() - timedelta(minutes=5)
    ).timestamp() * 1000

    request_method = event["requestContext"]["http"]["method"]
    request_uri = f"https://{event['requestContext']['domainName']}{event['requestContext']['http']['path']}"
    request_body = event["body"]
    timestamp = event["headers"]["x-hubspot-request-timestamp"]

    if int(timestamp) < five_minutes_ago_epoch_ms and recent_timestamps_only:
        LOGGER.warning(
            "Timestamp too old, must be within the past 5 minutes! %s should be > %s",
            timestamp,
            five_minutes_ago_epoch_ms,
        )
        return False

    hmac_payload = request_method + request_uri + request_body + timestamp
    sha256_hmac = hmac.new(
        hs_client_secret.encode("utf-8"),
        msg=hmac_payload.encode("utf-8"),
        digestmod=hashlib.sha256,
    )

    expected_signature = base64.b64encode(sha256_hmac.digest()).decode("utf-8")
    actual_signature = event["headers"]["x-hubspot-signature-v3"]

    return expected_signature == actual_signature
I chose to add the recent_timestamps_only parameter to make the five-minute time window optional, which makes testing this a lot easier. Outside of tests, you should only deactivate it if your system’s clock is very unreliable. The docs also mention the need to decode URL parameters, which I skipped here because the webhook calls the root path without any parameters. If you want to add parameters, you may want to look into urllib.parse.parse_qs.
This implementation effectively ensures that only authentic data will be further processed. However, one drawback of function URLs is that anyone could call the function URL, which may lead to economic attack vectors, but given that the URL is unpredictable and the time it takes for the validation to detect invalid signatures (or fail) is very short, the risk is limited.
I hope this helps some people who are currently trying to validate these kinds of requests.
— Maurice
