An unsung hero of Amazon SageMaker: Local Mode
Amazon SageMaker offers a highly customizable platform for machine learning at scale. Job execution within Amazon SageMaker can take some time to set up, which can be inconvenient or even time consuming during development and debugging phases. Running training and processing jobs locally can greatly increase the speed of development and debugging before running them at scale on AWS.
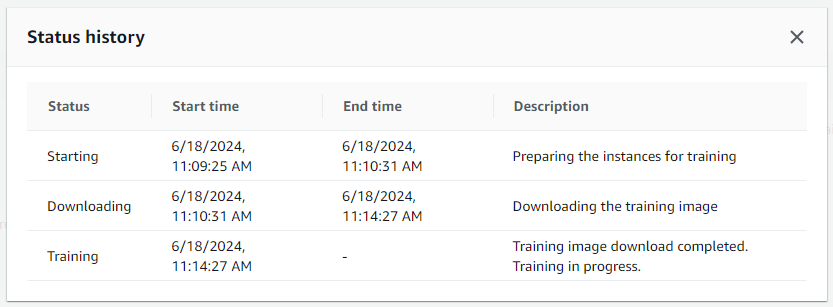
Consider the following training job initialization that takes around 5 minutes. Wouldn’t it be great to have it take a few seconds at most?
In this blog post, we will learn about the most exciting Amazon SageMaker feature according to me, and we will see how to leverage it for blazing fast development and debugging iteration cycles: Amazon SageMaker local mode. Amazon SageMaker local mode makes it possible to leverage the SageMaker API while running jobs locally. I consider this an incredibly awesome feature considering the initialization of a job can take from a few minutes to dozens of minutes depending on the required ML instance and configured docker image. Keep in mind, some Deep Learning Images can be up to a few dozen GB in size. The local mode of Amazon SageMaker helps us save time as each docker image is only downloaded once and furthermore, there is no time needed for preparing instances. As we will see later, we even have the possibility to avoid downloading the required data within the job container each time we start an Amazon SageMaker job.
Throughout the article, we will se some snippets. The complete code is available within a GitHub repository linked at the end of the article.
Now that we know what awaits us, let’s get started with setting up everything needed to run Amazon SageMaker jobs in local mode.
Setting up Amazon SageMaker local
The local mode of Amazon SageMaker requires a few dependencies.
-
docker: Amazon SageMaker uses docker containers to encapsulate jobs, so we need to have docker installed locally. In case your system does not have docker yet, you can either install Docker Desktop or Docker Engine. Linux users should have a look at Docker Linux postinstall to see how to run docker commands with non-root users. After installation and configuration, we should be able to run the following command:docker run hello-worldWhich should generate an output similar to the following one
Hello from Docker! [...] -
docker compose: Amazon SageMaker uses thecomposeplugin to create and manage training and processing jobs in local mode. In case your version of docker does not come with thecomposeplugin (e.g. if you use the Docker Engine), install the docker compose plugin. You can make sure the compose plugin is available by running the following commanddocker compose versionWhich should generate an output similar to the following one
Docker Compose version v2.26.1 -
sagemaker[local]: As you should have guessed, the Python SageMaker library is also needed. It has to be installed with the local extension, which, for example, installs the Python binding for docker and other needed dependencies.You can install it using the following command:
pip install "sagemaker[local]"
We are now ready to run Amazon SageMaker jobs locally. Let’s see how to do it.
Using Amazon SageMaker local mode for CPU instances
Amazon SageMaker local mode can emulate single or multiple CPU instances.
local mode with standalone jobs
For standalone Amazon SageMaker jobs, we have the following possibilities to run a job in local mode:
-
instance_type: By passing the instance type
localwherever an instance type is required, the standalone job will run locally.# file: launch_standalone_job_instance_type_local.py from sagemaker.sklearn.estimator import SKLearn as Estimator ... estimator = Estimator( ..., instance_type="local" ) estimator.fit(...) -
sagemaker_session: The SageMaker library provides through
sagemaker.local.LocalSessiona local session which can be used to run jobs locally.# file: launch_standalone_job_local_session.py from sagemaker.local import LocalSession from sagemaker.sklearn.estimator import SKLearn as Estimator ... estimator = Estimator( ..., sagemaker_session=sagemaker_session = LocalSession() ) estimator.start(...)
Executing either script should genate an output similar to the following one.
[...]
INFO:sagemaker:Creating training-job with name: sagemaker-scikit-learn-2024-06-06-21-36-17-360
[...]
INFO:sagemaker.local.local_session:Starting training job
[...]
nuipy8js9p-algo-1-a5ppq  | Invoking script with the following command:
[...]
nuipy8js9p-algo-1-a5ppq  | 2024-06-06 21:36:20,042 sagemaker-containers INFO     Reporting training SUCCESS
nuipy8js9p-algo-1-a5ppq exited with code 0
Aborting on container exit...
 Container nuipy8js9p-algo-1-a5ppq  Stopping
 Container nuipy8js9p-algo-1-a5ppq  Stopped
===== Job Complete =====
Local mode with Amazon SageMaker pipelines
The proper way to work with Amazon SageMaker pipelines in local mode is by passing a local pipeline session to the pipeline.
The SageMaker framework provides a local pipeline session that we can use for such cases through sagemaker.workflow.pipeline_context.LocalPipelineSession.
There are some limitations to consider when working with Amazon SageMaker pipeline jobs. For example, calling some Amazon SageMaker API endpoints such as ‘describe-training-job’ within the processing job with the name of the training job will result into an error, because the training job only exists locally and the API endpoint will try to fetch the information from the AWS Account. Those limitations are generally fine, as oftentimes we only want to pass artifacts from a step to another, and this works without issues.
The following snippet will create and execute an Amazon SageMaker pipeline in local mode.
# file: launch_sagemaker_pipeline_local_pipeline_session.py
from sagemaker.workflow.pipeline_context import LocalPipelineSession
from sagemaker.sklearn.estimator import SKLearn
from helpers import get_execution_role
...
role = get_execution_role()
local_pipeline_session = LocalPipelineSession()


processor = SKLearnProcessor(
    ...
    sagemaker_session=local_pipeline_session,
)

step_process = ProcessingStep(
    ...
    processor=processor,
)


estimator = SKLearn(
    ...
)

step_train = TrainingStep(
    ...
    depends_on=[step_process],
    estimator=estimator,
)

pipeline = Pipeline(
    sagemaker_session=local_pipeline_session,
    steps=[step_process, step_train],
)
pipeline.upsert(role_arn=role)
pipeline.start()
[...]
Starting pipeline step: 'IrisPreprocess'
[...]
Container frvhut9xbk-algo-1-d6uir  Creating
Container frvhut9xbk-algo-1-d6uir  Created
Attaching to frvhut9xbk-algo-1-d6uir
frvhut9xbk-algo-1-d6uir exited with code 0
Aborting on container exit...
Container frvhut9xbk-algo-1-d6uir  Stopping
Container frvhut9xbk-algo-1-d6uir  Stopped
===== Job Complete =====
Pipeline step 'IrisPreprocess' SUCCEEDED.
Starting pipeline step: 'TrainModel'
[...]
Container ks0j7181r2-algo-1-kzirl  Creating
Container ks0j7181r2-algo-1-kzirl  Created
Attaching to ks0j7181r2-algo-1-kzirl
[...]
ks0j7181r2-algo-1-kzirl  | 2024-06-10 12:29:09,215 sagemaker-containers INFO     Reporting training SUCCESS
ks0j7181r2-algo-1-kzirl exited with code 0
Aborting on container exit...
Container ks0j7181r2-algo-1-kzirl  Stopping
Container ks0j7181r2-algo-1-kzirl  Stopped
===== Job Complete =====
Pipeline step 'TrainModel' SUCCEEDED.
Pipeline execution 75c779b7-972b-46c4-887f-2b6d74c04cda SUCCEEDED
Using Amazon SageMaker local mode for GPU instances
Another nice extension of the SageMaker local mode is that it supports GPUs too. Assuming your computer has a CUDA-supported GPU installed, the local mode of Amazon SageMaker makes it possible to use it and run GPU-based jobs locally. Amazon SageMaker local mode currently only supports the emulation of a single GPU-based instance.
A few more requirements are needed to use Amazon SageMaker local mode for GPU instances:
- CUDA Toolkit: As it is to be expected, the CUDA Toolkit, which comes together with the CUDA driver, must be installed to be able to take advantage of any CUDA device available on the computer. In case it is not yet installed, the official CUDA Toolkit page provides information on how to install and configure it.
- NVIDIA Container Toolkit: The NVIDIA Container Toolkit allows containers running on our computer to leverage available GPUs for their workload. We can install it using the latest official installation guide.
Now that all requirements have been met, let’s see how to start GPU-based SageMaker job locally.
Similar to the CPU based SageMaker job, we use a special instance type for GPU based jobs in local mode: local_gpu.
To run GPU-based jobs we need GPU-based image URIs.
Both local and local_gpu are supported by the images_uris.retrieve method, so we can use it to get the right ECR image URI to run our GPU-based Amazon SageMaker jobs in local mode.
# file: retrieve_image_uri_instance_type_local_gpu.py
import sagemaker
...
image_uri = sagemaker.image_uris.retrieve(
    ...
    instance_type="local_gpu",
)
print("IMAGE_URI: ", image_uri)
IMAGE_URI: 763104351884.dkr.ecr.eu-central-1.amazonaws.com/tensorflow-training:2.13-gpu-py310
We can now go on and start a GPU based job that will run in local mode using the following snippet. In this case, we do not actually run a training, but simply make sure that tensorflow is able to access the GPU.
...
 # file: launch_standalone_job_instance_type_local_gpu.py
from sagemaker.tensorflow.estimator import TensorFlow as Estimator
from helpers import get_execution_role

estimator = Estimator(
    ...
    instance_type="local_gpu",
    role=get_execution_role(),
    image_uri=image_uri,
)

estimator.fit()
We can expect an output similar to:
INFO:sagemaker:Creating training-job with name: tensorflow-training-2024-06-17-12-24-58-610
...
services:
  algo-1-lhmao:
    command: train
    container_name: g3sqyce5t3-algo-1-lhmao
    deploy:
      resources:
        reservations:
          devices:
          - capabilities:
            - gpu
    image: 763104351884.dkr.ecr.eu-central-1.amazonaws.com/tensorflow-training:2.13-gpu-py310
...
 Container g3sqyce5t3-algo-1-lhmao  Creating
 Container g3sqyce5t3-algo-1-lhmao  Created
Attaching to g3sqyce5t3-algo-1-lhmao
...
g3sqyce5t3-algo-1-lhmao  |     "num_gpus": 1,
...
g3sqyce5t3-algo-1-lhmao  | SM_NUM_GPUS=1
...
g3sqyce5t3-algo-1-lhmao  | GPU_DEVICES:  [PhysicalDevice(name='/physical_device:GPU:0', device_type='GPU')]
Aborting on container exit...
 Container g3sqyce5t3-algo-1-lhmao  Stopping
 Container g3sqyce5t3-algo-1-lhmao  Stopped
===== Job Complete =====
What about the data ?
Depending on the use case and the overall size of the data needed for our training or processing jobs, it can take some time to download all that data into the Amazon SageMaker instances on which our jobs are running.
If you paid attention to the logs previously generated by SageMaker, you may have found out that we are able to peek into the data that is used for our local SageMaker Jobs. This information is available in the volumes section of the docker compose file printed by SageMaker at the beginning of the local job execution.
Amazon SageMaker jobs in local mode can be configured with two data sources:
Amazon S3: Amazon SageMaker will still have to download the input data from s3 to make it available within the job container each time the job is started. The code snippets previously presented in this article upload the data into the default Amazon SageMaker bucket and then reference it as data source. Inspecting a container created by one of the previous job snippets should provide an output similar to the following one:
INFO:sagemaker.local.image:docker compose file:
networks:
  sagemaker-local:
    name: sagemaker-local
services:
  algo-1-idjuw:
  ...
    volumes:
    - /tmp/tmpfc_gu0_i/algo-1-idjuw/input:/opt/ml/input
    - /tmp/tmpfc_gu0_i/algo-1-idjuw/output:/opt/ml/output
    - /tmp/tmpfc_gu0_i/algo-1-idjuw/output/data:/opt/ml/output/data
    - /tmp/tmpfc_gu0_i/model:/opt/ml/model
    - /tmp/tmpteb09e08:/opt/ml/input/data/train     <===============================================HERE
    - /home/.../aws-blog.de-projects/sagemaker-local/src:/opt/ml/code
    - /tmp/tmpfc_gu0_i/shared:/opt/ml/shared
...
In case the information is not printed, it is also possible to access it using the docker inspect command. The Binds field in HostConfig contains the relevant information.
docker inspect <container-identifier>
...
    "HostConfig": {
        "Binds": [
            "/tmp/tmpfc_gu0_i/algo-1-idjuw/input:/opt/ml/input:rw",
            "/tmp/tmpfc_gu0_i/algo-1-idjuw/output:/opt/ml/output:rw",
            "/tmp/tmpfc_gu0_i/algo-1-idjuw/output/data:/opt/ml/output/data:rw",
            "/tmp/tmpfc_gu0_i/model:/opt/ml/model:rw",
            "/tmp/tmpteb09e08:/opt/ml/input/data/train:rw",      <==================================HERE
            "/home/.../aws-blog.de-projects/sagemaker-local/src:/opt/ml/code:rw",
            "/tmp/tmpfc_gu0_i/shared:/opt/ml/shared:rw"
        ]
    }
...
We can notice that a temporary folder is mounted as source for the train data bind mount. A new temporary folder will be created for each execution of the job and SageMaker will download the data into the new folder every time.
Local files: When running in local mode and using local file data sources, the SageMaker frameworks directly creates a bind mount with the configured input paths, so no time is spent waiting for data to be downloaded. In case the data is initially located in S3, we just have to download it once and use it as local file data source for our SageMaker jobs running in local mode. The following snippet creates an Amazon SageMaker job in local mode and uses local files as a data source.
# file: launch_standalone_job_local_session_local_data.py

import pathlib
from sagemaker.local import LocalSession
from sagemaker.sklearn.estimator import SKLearn as Estimator


train_input = "file://" + str(pathlib.Path(__file__).parent.joinpath("data", "train"))

estimator = Estimator(
    ...
    sagemaker_session=LocalSession(),
)

estimator.fit({"train": train_input})
When inspecting the container, we should get something similar to the following output, where it can be seen that the configured data source was directly used as bind mount for the train input channel.
...
    - /tmp/tmpoichy11u/algo-1-g3v0l/input:/opt/ml/input
    - /tmp/tmpoichy11u/algo-1-g3v0l/output/data:/opt/ml/output/data
    - /tmp/tmpoichy11u/algo-1-g3v0l/output:/opt/ml/output
    - /tmp/tmpoichy11u/model:/opt/ml/model
    - /home/.../aws-blog.de-projects/sagemaker-local/data/train:/opt/ml/input/data/train     <======HERE
    - /home/.../aws-blog.de-projects/sagemaker-local/src:/opt/ml/code
    - /tmp/tmpoichy11u/shared:/opt/ml/shared
...
The full code is available in the companion repository on Github.
Summary
Amazon SageMaker local mode is one of SageMaker features I am most excited about. In this blog article, we discussed why it could be a game-changer and went through the steps required to use it. We should now be able to take the most out of Amazon SageMaker local mode when developing or debugging our SageMaker jobs. I hope this article was helpful. I am always happy to receive comments or feedback.
— Franck
Title Photo by Priscilla Du Preez 🇨🇦 on Unsplash