How to ingest MQTT data from VerneMQ into your Data Lake using IoT Core
This post explains how you can ingest data from a MQTT broker such as VerneMQ into your data lake via IoT Core and Kinesis Data Firehose. We’ll set up a data processing pipeline from start to finish in Terraform.
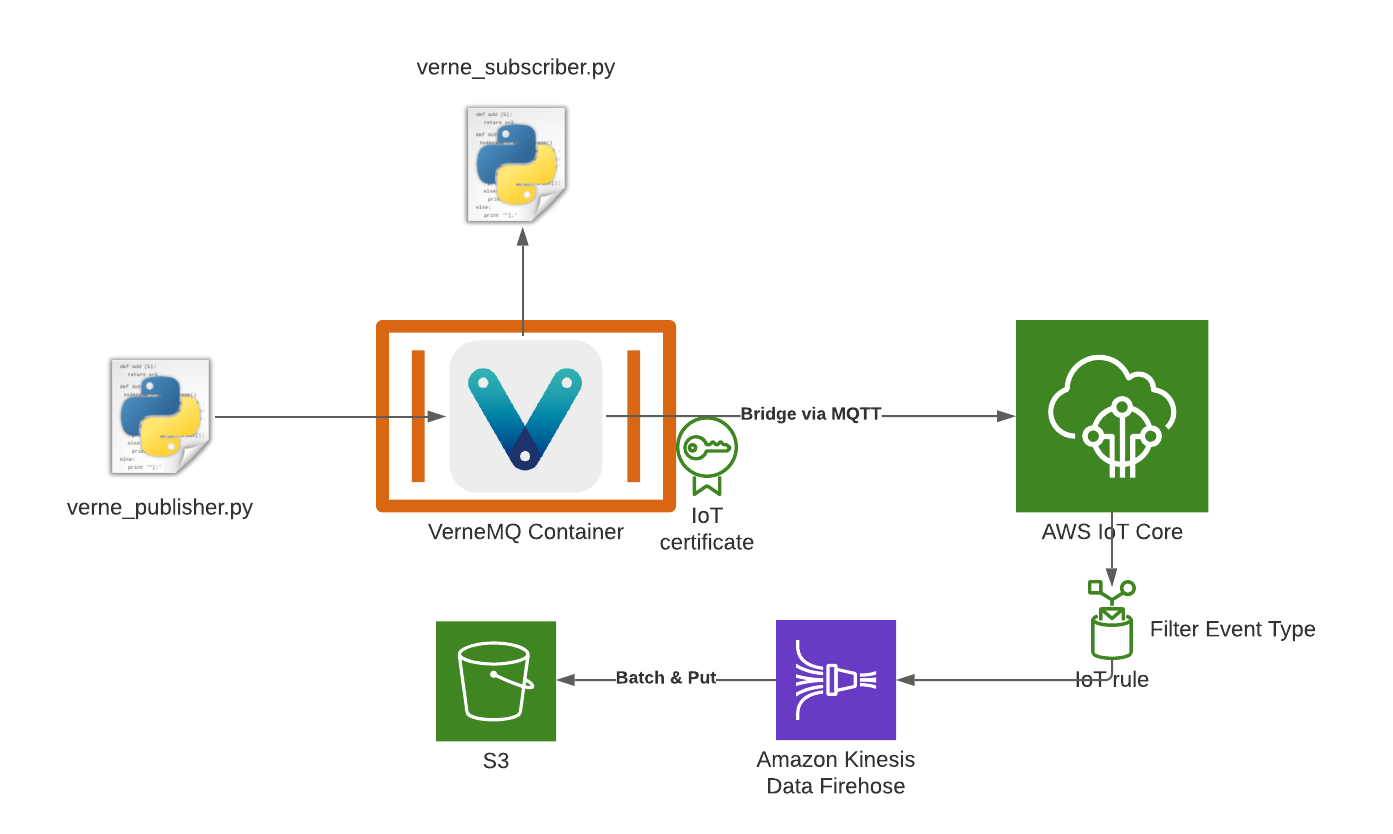
IoT devices generate a lot of data that can be interesting to analyze. One common way to facilitate that is through a data lake architecture. In this post I’m going to show you how to ingest data from your VerneMQ MQTT broker into your data lake. That means we’re going to set up a data processing pipeline that starts with VerneMQ and ends in S3. This pipeline consists of a few components which we’ll now take a look at:
- VerneMQ is the message broker where the messages originate. In principle this can be any kind of MQTT broker that supports a bridge setup.
- AWS IoT Core is a MQTT broker that integrates with lots of other AWS services and allows you to subscribe to certain topics and filter messages for further processing.
- Kinesis Data Firehose is a service that can be used to process streaming data. You can also use it to buffer and batch data before writing it to something like S3, which we’re doing in this case.
- S3 is the storage service of choice for datalakes, we’re using it to store the raw data.
Using these services we’re going to configure a bridge between VerneMQ and IoT Core, then configure a filter rule in IoT core, connect Kinesis Firehose to it and use that to store the data in S3.

For our demo setup I’m using Terraform to deploy the infrastructure. You can find the code on Github if you want to try it yourself. The repository also contains the setup for a VerneMQ container with the bridge configuration, but we’ll have to do some configuration before we start that.
First we need to deploy the terraform resources in our account using terraform apply. This will create a few things: a certificate in IoT Core that’s associated with a role and lets us publish data to IoT Core. Furthermore, it sets up Kinesis Data Firehose with an S3 bucket behind it, as well as a rule to filter messages from IoT Core and forward them to Kinesis.
The output of the inital deployment will contain a variable called iot_endpoint - you’ll have to edit your docker-compose.yml and update the value of the DOCKER_VERNEMQ_VMQ_BRIDGE.ssl.sbr0 environment variable. Next you should run the following commands in order to download the certificate and keys into the local/ssl directory. This will later be mounted into the container and allow VerneMQ to talk to IoT Core.
wget https://www.amazontrust.com/repository/AmazonRootCA1.pem -P local/ssl/
terraform output -raw cert_pem > local/ssl/cert.pem
terraform output -raw cert_public_key > local/ssl/cert.pub
terraform output -raw cert_private_key > local/ssl/cert.private
The contents of the local/ssl directory are sensitive and have been added to the .gitignore file so you don’t accidentially check them in. Now you’re ready to test your set up. You can run docker-compose up to start VerneMQ. The way it’s configured, it will forward any messages to IoT Core, but that can be adjusted using the DOCKER_VERNEMQ_VMQ_BRIDGE.ssl.sbr0.topic.1 environment variable. The container will also expose the local MQTT port to the host and create a user admin, which we can use to connect.
That’s exactly what we’re going to do next. I’ve included two Python Scripts to publish messages and subscribe to messages on the local broker. First we need to create a virtual environment and install the dependencies:
python3 -m venv .venv
source .venv/bin/activate
pip install -r requirements.txt
Next, we can run the publisher and subscriber in separate terminals after activating the virtual environment:
# Run in terminal 1 with the venv activated
$ python verne_publisher.py
# [...]
Publishing {'timestamp': '2021-12-30T15:56:40.741519+00:00', 'eventType': 'IT_RAINED_FROGS', 'text': 'Hello World!'} to demo
publish result: 160
Publishing {'timestamp': '2021-12-30T15:56:45.743160+00:00', 'eventType': 'FLUX_COMPENSATOR_START', 'text': 'Hello World!'} to demo
publish result: 161
# [...]
# Optional, run in terminal 2 with the venv activated
$ python verne_subscriber.py
# [...]
demo b'{"timestamp": "2021-12-30T15:57:35.775857+00:00", "eventType": "IT_RAINED_FROGS", "text": "Hello World!"}'
demo b'{"timestamp": "2021-12-30T15:57:40.776245+00:00", "eventType": "FLUX_COMPENSATOR_START", "text": "Hello World!"}'
demo b'{"timestamp": "2021-12-30T15:57:45.778000+00:00", "eventType": "ENGINE_EXPLODED", "text": "Hello World!"}'
demo b'{"timestamp": "2021-12-30T15:57:50.783566+00:00", "eventType": "FLUX_COMPENSATOR_START", "text": "Hello World!"}'
demo b'{"timestamp": "2021-12-30T15:57:55.785675+00:00", "eventType": "FLUX_COMPENSATOR_START", "text": "Hello World!"}'
# [...]
This script will now publish a few sample events to the broker. If you started the subscriber as well, you should see them popping up in the terminal every couple of seconds. Both of these scripts operate on the local resources, we don’t see what’s going on with IoT core here. Note that the eventType attribute varies within the published messages.
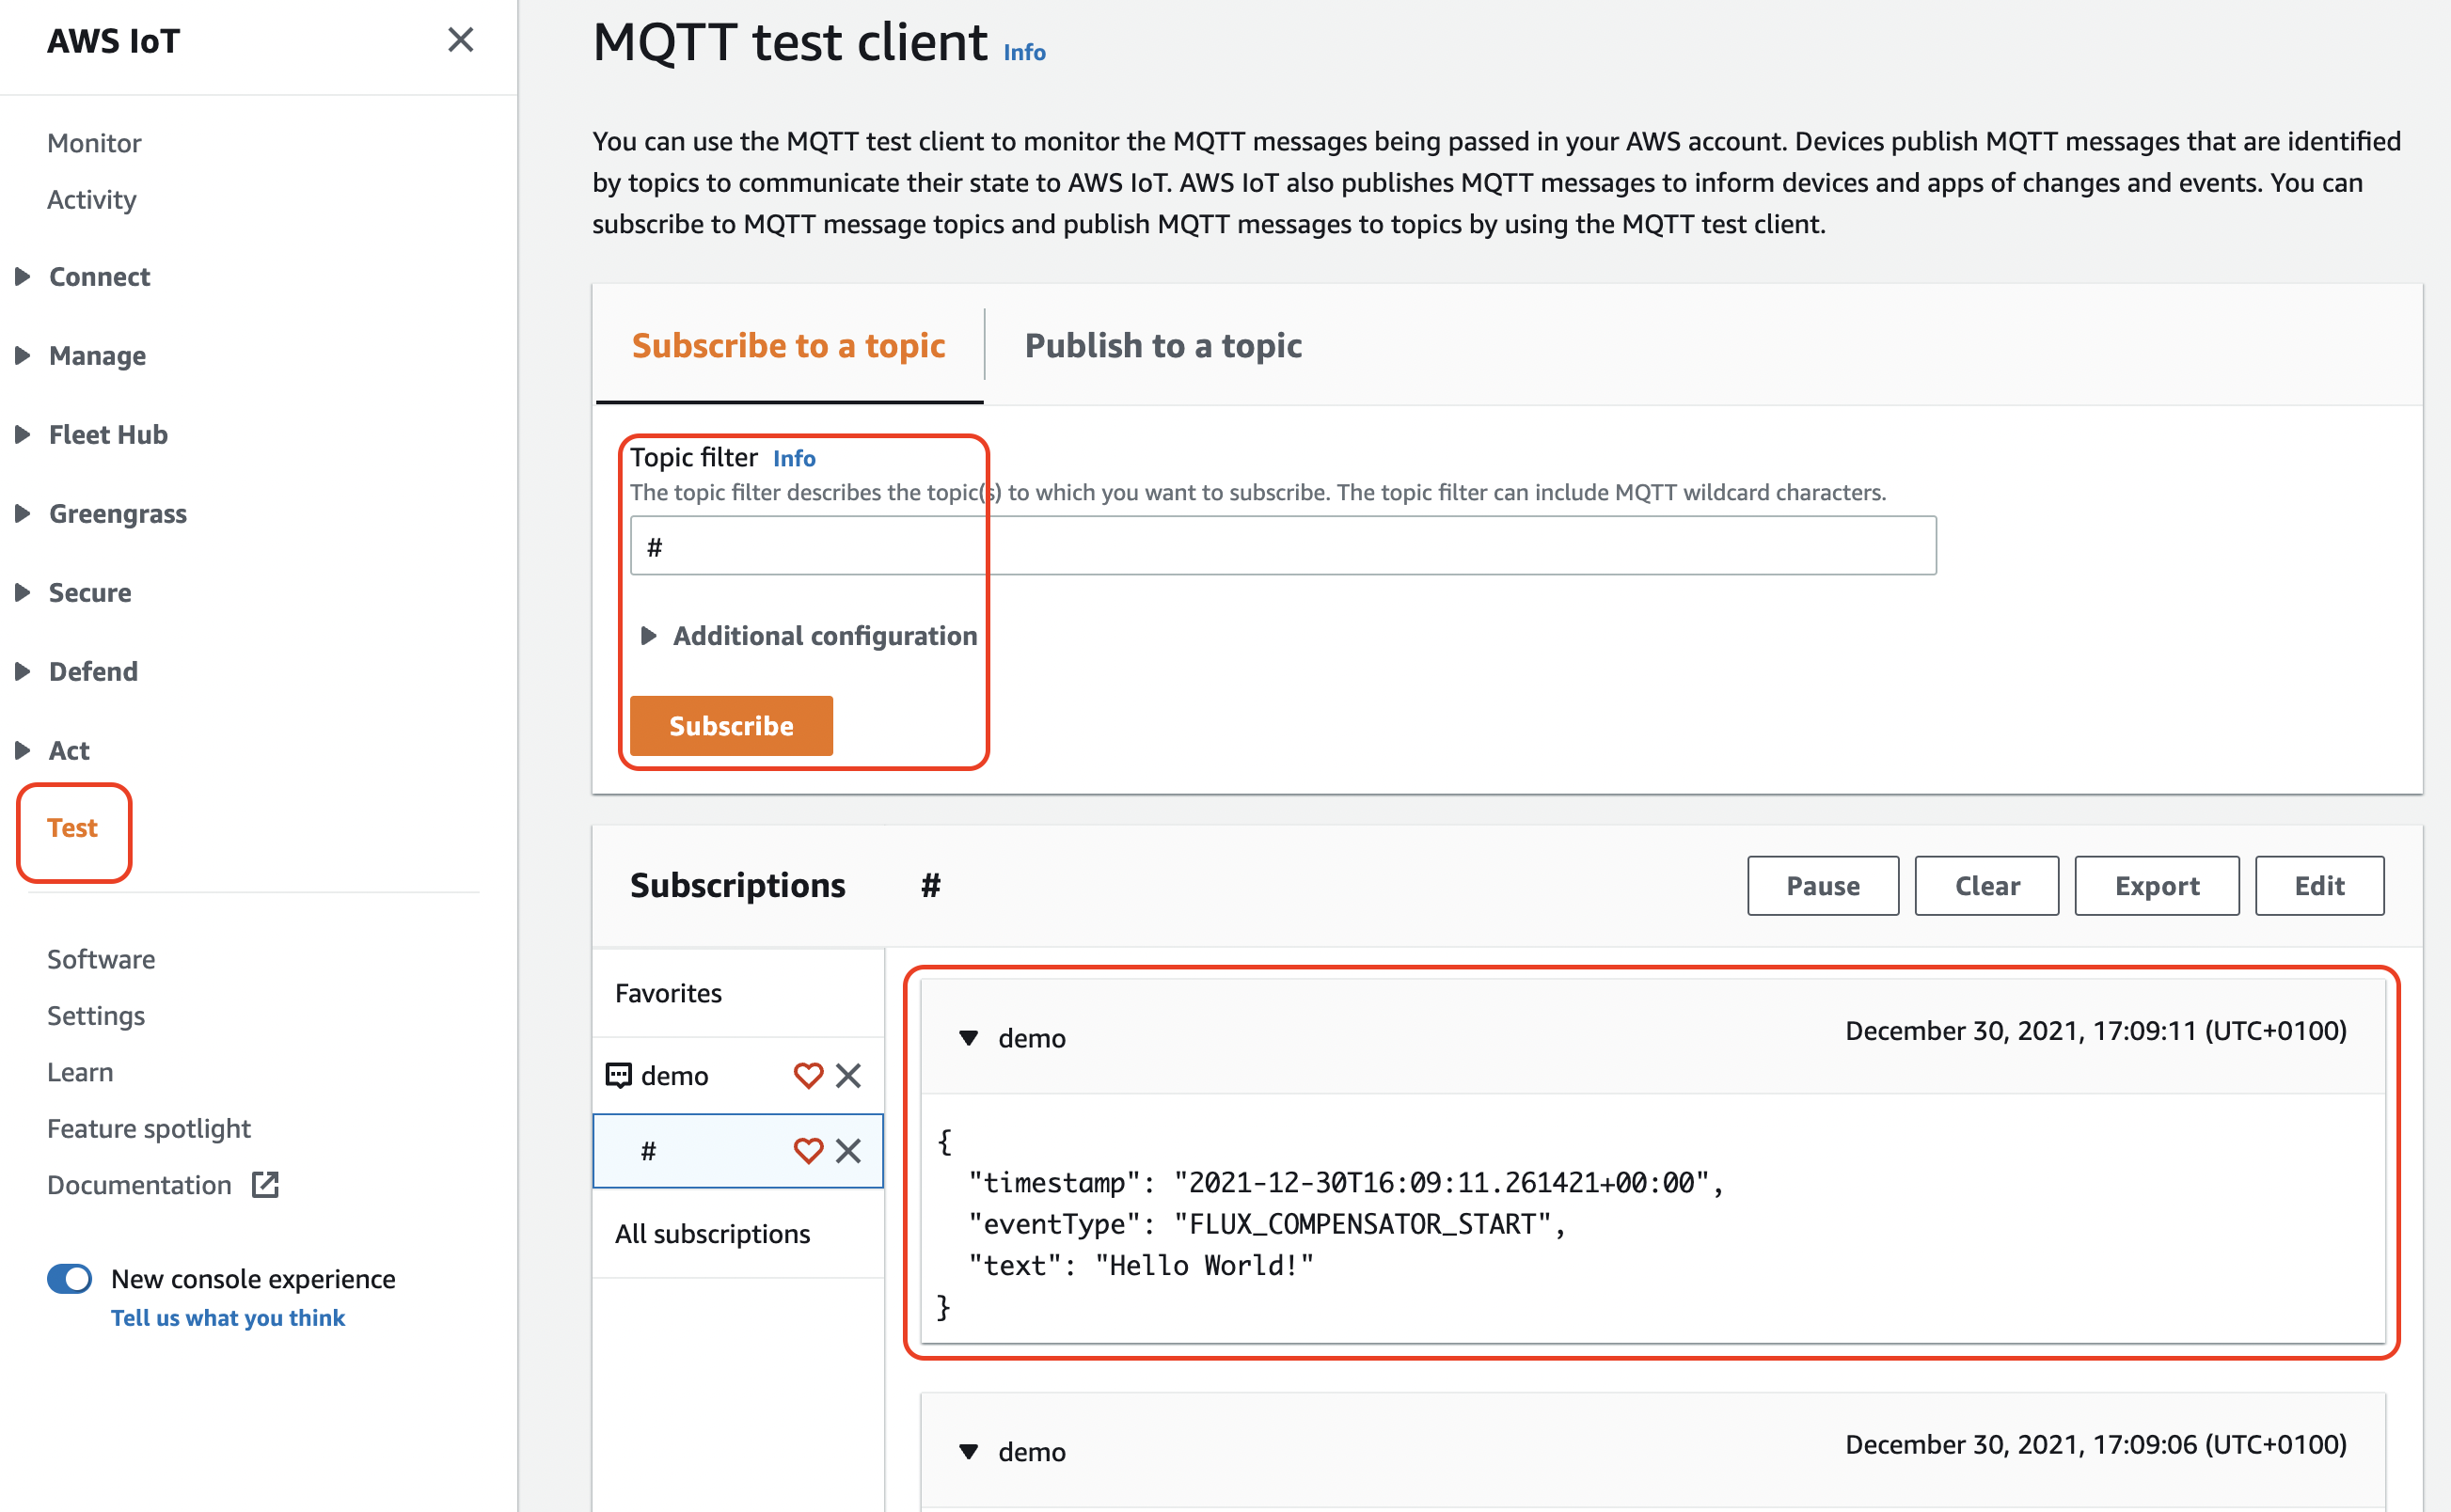
To see if everything is working in IoT core, we can open the AWS Management console, navigate to IoT core and use the “Test” functionality to subscribe to all messages (#-wildcard), that should look something like this:

After a few minutes, we should also see files showing up in S3. They’re deposited there by Kinesis Data Firehose. If you open the files, you’ll see something like this:
{"timestamp": "2021-12-30T15:17:14.286727+00:00", "eventType": "ENGINE_EXPLODED", "text": "Hello World!"}
{"timestamp": "2021-12-30T15:17:19.291313+00:00", "eventType": "ENGINE_EXPLODED", "text": "Hello World!"}
{"timestamp": "2021-12-30T15:17:24.296688+00:00", "eventType": "ENGINE_EXPLODED", "text": "Hello World!"}
You’ll notice that not all events show up here. That’s because the rule we created through terraform created a filter on the events that are forwarded to the stream.
resource "aws_iot_topic_rule" "rule" {
  name        = "PushToKinesisFirehose"
  description = "Push a subset to kinesis firehose"
  enabled     = true
  sql         = "SELECT * FROM '#' WHERE eventType = 'ENGINE_EXPLODED'"
  sql_version = "2016-03-23"

  firehose {
    delivery_stream_name = aws_kinesis_firehose_delivery_stream.s3_stream.name
    role_arn             = aws_iam_role.role.arn
    separator            = "\n"
  }

}
As you can see here, we’re using a SQL statement to get messages from all topics (#-wildcard) and select all those that have an eventType attribute with the value ENGINE_EXPLODED. Only those events that match these criteria are forwarded and ultimately stored in S3.
We can now run our Glue Crawler on the data to add it to the Glue Data Catalog and later query it through Athena or Quicksight. If you’re unfamiliar with Glue, here is an introduction to the service and its various features.
You can also do more things with Kinesis Data Firehose such as transform and/or compress the data, but that’s a tale for another day.
Summary
In this post I have shown you how to set up a bridge between VerneMQ and IoT Core and how to connect Kinesis Data Firehose to IoT Core in order to ingest data into your datalake. You can find the code for all of this on Github.
For any feedback, questions or concerns, feel free to reach out via the social media channels in my bio.
