The CDK pipeline construct
This content is more than 4 years old and the cloud moves fast so some information may be slightly out of date.
Generation of Infrastructure-as-Code is fun. To be the real DevOps hero, you should build a complete CI-CD pipeline. But this is a piece of work. And if you want to deploy to multiple accounts, it gets tricky. With the new CDK, builtin pipeline Construct, it’s easy - if you solve a few problems. Here is a complete walk-through.
CDK Pipeline Construct in “tecRacer - Let’s build” on youtube
13:00 - 24:00 Deploy into Pipeline, look into the pipeline
Migrate your bootstrap bucket and template to the new format
To use the new CdkPipeline Construct, you have to re-create the deployment bucket. Re-Create buckets for each region.
- Search deployment buckets:
aws s3api list-buckets --query "Buckets[?starts_with(Name,'cdk')]"
If you have trouble with awscli v2 using less as a pager: `export AWS_PAGER=""`
- Export you bucket name in a var to work with it
export bucket=cdktoolkit-stagingbucket-whatever123
- Check region of bucket:
aws s3api get-bucket-location --bucket $bucket
-
Empty bucket
USE WITH caution
aws s3 rm s3://$bucket --recursiveShould look like:
delete: s3://cdktoolkit-stagingbucket-6kj8tffvekzq/assets/8ccb16b9f4cf6fc9c98ed2967ca48482a14dadc4546d7a2f2233b4174d60ed31.zip delete: s3://cdktoolkit-stagingbucket-6kj8tffvekzq/assets/f35d0a3ea655835ce2bf399c19e80a38397cebc9cff491b04a9312c92d338669.zip delete: s3://cdktoolkit-stagingbucket-6kj8tffvekzq/assets/14d59e142b10f49f4281a1a2544d73b328e6db798fba66d3b5d21701f3112fe7.zip delete: s3://cdktoolkit-stagingbucket-6kj8tffvekzq/assets/eec58f9e483060f7f7256b6874e6ccd51ae397adf9a8035ac91dded5dad5f17a.zip delete: s3://cdktoolkit-stagingbucket-6kj8tffvekzq/assets/81bb840a01a5a6f45d57a824e4c02339fcef8797ffc70e360712c031cd29f999.zip -
Delete bucket
aws s3 rb s3://$bucket
- Update CDK, you need at least 1.51
npm i cdk -g
- Switch configuration to new bootstrap version
export CDK_NEW_BOOTSTRAP=1
You have to stay in the same shell session now.
- Get your account number
export account=$(aws sts get-caller-identity --query 'Account' --output text)
- Set your region
export region=eu-central-1
Replace this with you region
- Set your profile
export profile=myprofile
- Bootstrap new bucket
npx cdk bootstrap --profile $profile --cloudformation-execution-policies arn:aws:iam::aws:policy/AdministratorAccess aws://$account/$region
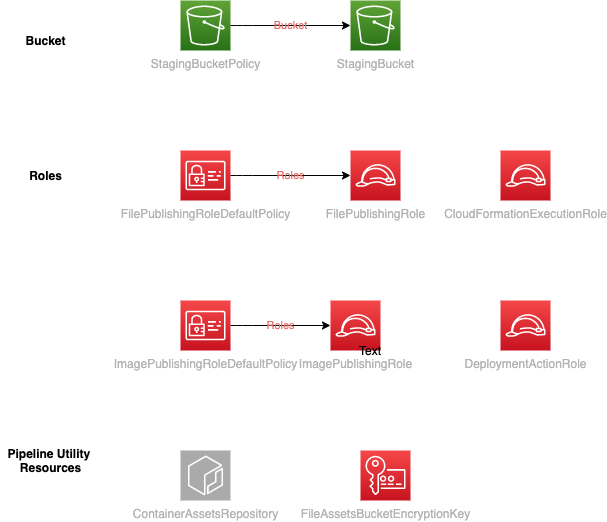
You will see that the generated bootstrap CloudFormation template contains more than just a bucket:
CDKToolkit: creating CloudFormation changeset...
[█████▎····················································] (1/11)

14:40:07 | CREATE_IN_PROGRESS   | AWS::IAM::Role        | ImagePublishingRole
14:40:07 | CREATE_IN_PROGRESS   | AWS::IAM::Role        | CloudFormationExecutionRole
14:40:08 | CREATE_IN_PROGRESS   | AWS::IAM::Role        | FilePublishingRole
...

Besides the bucket you will need some extra roles for a pipeline and for using custom Containers, also the bootstrap stack added an AssetRepository Container.
Create a sample app
Now we create an app, which we will pipelinefy.
- Create
mkdir cdk-pipeline && cd cdk-pipeline
cdk init sample-app --language=typescript
cdk list
cdk deploy
-
Check

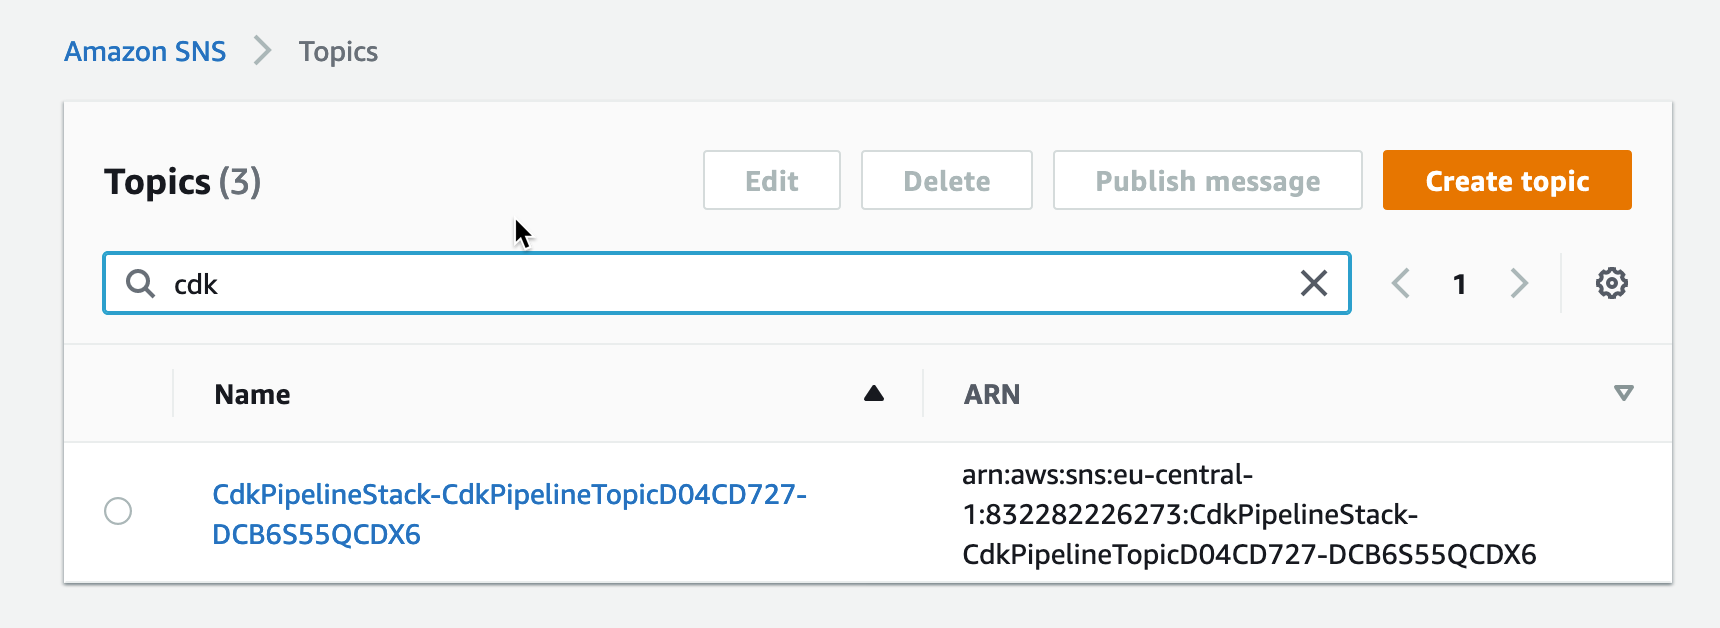
We check that the SNS topic is there and destroy the stack again.
-
Destroy
cdk destroy
Create repository and push
The cdk-pipeline directory must not be part of any git repo before. We set the new repository as input for the pipeline.
Inside the “cdk-pipeline” directory:
- Create local repo
git init
*Caution* : In `.gitignore` the rule to ignore "*.js" is set. That will not work with Lambda Function Constructs.
- (Optional) Change
.gitignore, otherwise the line*.jscan become a problem for ts Lambdas code.
lib/*.js
bin/*.js
test/*.js
!jest.config.js
*.d.ts
node_modules

# CDK asset staging directory
.cdk.staging
cdk.out

# Parcel default cache directory
.parcel-cache
New `.gitignore`
- Create remote CodeCommit You may replace this with any supported repository.
aws codecommit create-repository --repository-name "cdk-pipeline" --repository-description "Pipeline-Demo"
- Commit local changes to local
git add .
git commit -m "demo"
- Connect your local repo to the new created CodeCommit repo
git remote add origin https://git-codecommit.eu-central-1.amazonaws.com/v1/repos/cdk-pipeline
- Change branch to
main
git branch main
git checkout main
- Push local changes to the remote repository
git push --set-upstream origin main
-
(optional) Use git-remote-codecommit
If you work with multiple CodeCommit repositories, consider using GitHub - aws/git-remote-codecommit: An implementation of Git Remote Helper that makes it easier to interact with AWS CodeCommit.
With my profile being named “trainingsdemo” and region eu-central-1, the
.git/configlooks like
[core]
      repositoryformatversion = 0
      filemode = true
      bare = false
      logallrefupdates = true
      ignorecase = true
      precomposeunicode = true
[remote "origin"]
      url = codecommit::eu-central-1://trainingsdemo@cdk-pipeline
      fetch = +refs/heads/*:refs/remotes/origin/*
[branch "main"]
      remote = origin
      merge = refs/heads/main
The remote helper uses you AWS profile for push and pull, even if you are using a different profile. It **really** helps!
Wrap CDK Stack in the new Pipeline Construct
New the stack will be wrapped in a Pipeline Construct:

We change bin/cdk-pipeline.ts from:
#!/usr/bin/env node
import * as cdk from '@aws-cdk/core';
import { CdkPipelineStack } from '../lib/cdk-pipeline-stack';

const app = new cdk.App();
new CdkPipelineStack(app, 'CdkPipelineStack');
to
#!/usr/bin/env node
import { Stage, Construct, StageProps, Stack, App } from '@aws-cdk/core';
import { CdkPipelineStack } from '../lib/cdk-pipeline-stack';
import { CdkPipeline, SimpleSynthAction } from '@aws-cdk/pipelines';
import { Artifact } from '@aws-cdk/aws-codepipeline'
import { CodeCommitSourceAction, CodeCommitTrigger } from '@aws-cdk/aws-codepipeline-actions'
import { Repository } from '@aws-cdk/aws-codecommit'


/**
 * Your application
 *
 * May consist of one or more Stacks
 */
class MyApplication extends Stage {
    constructor(scope: Construct, id: string, props: StageProps) {
        super(scope, id, props);
        new CdkPipelineStack(this, 'CdkPipelineStack', {
        });
    }
}

/**
 * Stack to hold the pipeline
 */
class PipelineWrapperStack extends Stack {
    constructor(scope: Construct, id: string, props: StageProps) {
        super(scope, id, props);

        const sourceArtifact = new Artifact();
        const cloudAssemblyArtifact = new Artifact();

        const repository = Repository.fromRepositoryName(this, "cdk-pipeline", "cdk-pipeline")

        const pipeline = new CdkPipeline(this, 'CiCd',
            {
                pipelineName: "PipelineWrapperStack",
                cloudAssemblyArtifact,
                sourceAction: new CodeCommitSourceAction({
                    actionName: 'CodeCommit',
                    repository,
                    branch: 'main',
                    trigger: CodeCommitTrigger.EVENTS,
                    output: sourceArtifact,

                }),
                synthAction: SimpleSynthAction.standardNpmSynth({
                    sourceArtifact,
                    cloudAssemblyArtifact,
                })
            })

        pipeline.addApplicationStage(new MyApplication(this, 'Dev', {
            env: {
                region: 'eu-central-1',
                account: '111111111111',
            }
        }))

    }
}

const app = new App();
new PipelineWrapperStack(app
    , 'PipelineWrapperStack',
    {
        env: {
            region: 'eu-central-1',
            account: '111111111111',
        },


    })
Just replace the region ’eu-central-1’ and the account ‘111111111111’ with your region and account number.
In simple steps:
- Add libraries:
npm add @aws-cdk/aws-codepipeline @aws-cdk/aws-codepipeline @aws-cdk/aws-codepipeline-actions @aws-cdk/aws-codecommit @aws-cdk/pipelines
You will need the package-lock.json committed to the repository. Otherwise, you may get errors in the pipeline like:
npm ERR! cipm can only install packages with an existing package-lock.json or npm-shrinkwrap.json with lockfileVersion >= 1. Run an install with npm@5 or later to generate it, then try again.
- Add imports for the pipeline:
import { Stage, Construct, StageProps, Stack, App, DefaultStackSynthesizer } from '@aws-cdk/core';
import { CdkPipeline, SimpleSynthAction } from '@aws-cdk/pipelines';
import { Artifact } from '@aws-cdk/aws-codepipeline'
import { CodeCommitSourceAction, CodeCommitTrigger } from '@aws-cdk/aws-codepipeline-actions'
import { Repository } from '@aws-cdk/aws-codecommit'
- Create the Application as a Stage
class MyApplication extends Stage {
  constructor(scope: Construct, id: string, props: StageProps) {
    super(scope, id, props);
    new CdkPipelineStack(this, 'CdkPipelineStack');
  }
}
in `lib/cdk-pipeline-stack.ts` change constructor line:
constructor(scope: cdk.Construct, id: string, props?: cdk.StackProps) {
to use `Construct` as scope, not `app`.
- Wrap the application in a pipeline:
class PipelineWrapperStack extends Stack {
  constructor(scope: Construct, id: string, props: StageProps) {
    super(scope, id, props);

    const sourceArtifact = new Artifact();
    const cloudAssemblyArtifact = new Artifact();
Start a Stack
const repository = Repository.fromRepositoryName(this, "cdk-pipeline", "cdk-pipeline")
Use the created codecommit repos. Change the name if your repository name is not "cdk-pipeline".
      const pipeline = new CdkPipeline(this, 'CiCd',
      {
        pipelineName: "PipelineWrapperStack",
        cloudAssemblyArtifact,
        sourceAction: ...

        }),
        synthAction: ...
      })
Create a Pipeline with the created artifact. "Artifacts" is the place where outputs are stored.
 sourceAction: new CodeCommitSourceAction({
          actionName: 'CodeCommit',
          repository,
          branch: 'main',
          trigger: CodeCommitTrigger.EVENTS,
          output: sourceArtifact,

        }),
The Source Action describes the source, so we use the newly created CodeCommit repository.
synthAction: SimpleSynthAction.standardNpmSynth({
          sourceArtifact,
          cloudAssemblyArtifact,
        })
This is a part where the magic happens. CDK creates a standard synth with a generated buildspec for you.
If you have to compile a lambda, you can add `buildCommand` here.
 pipeline.addApplicationStage(new MyApplication(this, 'Dev', {
      env: {
        region: 'eu-central-1',
        account: '012345678912',
      }
    }))
Now you add the application itself as a stage. Here you may deploy your stack to multiple accounts, as shown in the documentation:
  // Testing stage
  pipeline.addApplicationStage(new MyApplication(this, 'Testing', {
    env: { account: '111111111111', region: 'eu-west-1' }
  }));

  // Acceptance stage
  pipeline.addApplicationStage(new MyApplication(this, 'Acceptance', {
    env: { account: '222222222222', region: 'eu-west-1' }
  }));

  // Production stage
  pipeline.addApplicationStage(new MyApplication(this, 'Production', {
    env: { account: '333333333333', region: 'eu-west-1' }
  }));
Configure application for new bootstrap format
Change cdk.json from:
{
  "app": "npx ts-node bin/cdk-pipeline.ts",
  "context": {
    "@aws-cdk/core:enableStackNameDuplicates": "true",
    "aws-cdk:enableDiffNoFail": "true"
  }
}
to
{
  "app": "npx ts-node bin/cdk-pipeline.ts",
  "context": {
    "@aws-cdk/core:enableStackNameDuplicates": "true",
    "aws-cdk:enableDiffNoFail": "true",
  "@aws-cdk/core:newStyleStackSynthesis": "true"
  }
}
Deploy the pipeline
-
Build
npm buildor build continuously withnpm run watch -
Deploy the pipeline
cdk deploy

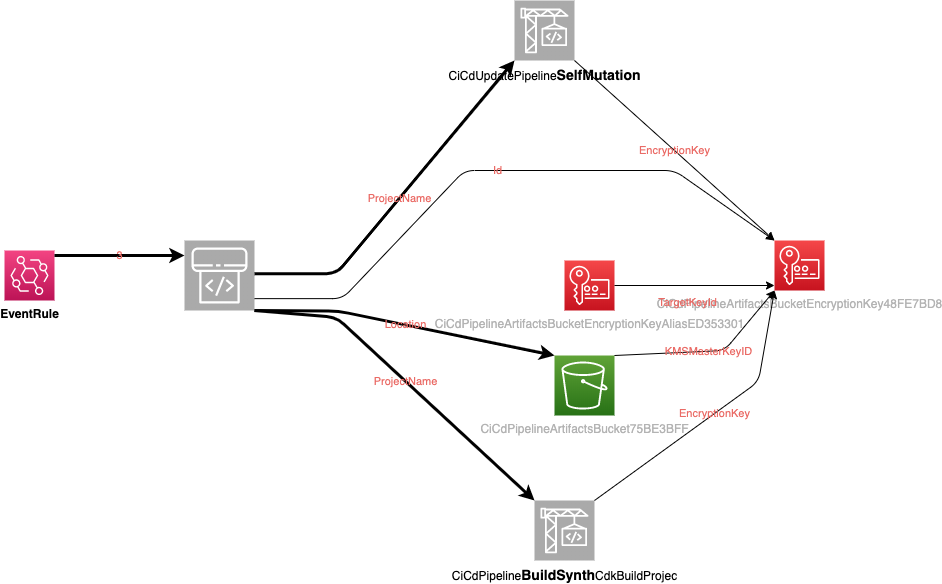
This step deploys two Build projects. The self mutating build for the pipeline and the “payload” stack.
Self Mutating Build
{
  "version": "0.2",
  "phases": {
    "install": {
      "commands": "npm install -g aws-cdk"
    },
    "build": {
      "commands": [
        "cdk -a . deploy PipelineWrapperStack --require-approval=never --verbose"
      ]
    }
  }
}
The Buildspec of the self mutation Build Project show that it creates the pipeline itself.
BuildSynth Build
{
  "version": "0.2",
  "phases": {
    "pre_build": {
      "commands": [
        "npm ci"
      ]
    },
    "build": {
      "commands": [
        "npx cdk synth"
      ]
    }
  },
  "artifacts": {
    "base-directory": "cdk.out",
    "files": "**/*"
  }
}
The BuildSynth build builds the “Payload” Stack itself.
Commit Changes = Deploy Changes
Let’s test the pipeline: Change one line in lib/cdk-pipeline-stack.ts:
Change
const topic = new sns.Topic(this, 'CdkPipelineTopic');
to
    const topic = new sns.Topic(this, 'CdkPipelineTopic',
    {
      topicName: "NewTopic"
    });
So you rename the SNS topic.
- Test Changes
npm run build && cdk list
This should output "PipelineWrapperStack"
- Commit
git add .
git commit -m "minor changes"
git push
- Wait/Look at CodeBuild logs

Summary
The code cdk-pipeline is at the tecRacer Github repository.
OK, it is complicated to create the first pipeline construct. However - it’s a big step towards automation and deploying into multiple stages without building all stages from scratch.
See the original documentation for details: here
Thanks for reading, please comment with twitter. And also visit our twitch channel: twitch.
Stay healthy in the cloud and on earth!
Thanks
Photo by Christophe Dion on Unsplash
